Showing posts with label restoration. Show all posts

Saturday, June 23, 2007

You make me dizzy

It seems like ages since I've updated - actually, it is: over two months. In that time Dame Zara has been behaving nicely (on the whole - see below), and we're now showing (1)59,910 or so on the odometer, meaning that we've covered over 8200 miles since February 2006.

Another nice day in the country
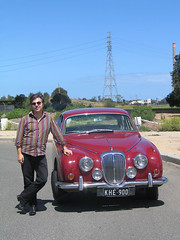
A few weekends ago we joined the monthly DLCV Sunday run and headed off with a strong contingent of cars (nine Daimlers, including Keith Ashworth's rare Regency Sportsman, in the centre of the lower pic) into central Victoria to visit experienced restorer Roy Shelton, who's currently working on a 1930s Daimler 15. It looks like a massive job, but Roy's well on the way and is confident he'll have the 15 back on the road before to long - to join his nice blue Daimler V8 saloon, Ford Model T, Delahaye (or was it a Darracq?) and 1931 Chev ...


Dizzy spells
It's well and truly winter now, and I'd been noticing that Dame Zara was a bit reluctant to start from cold, needed the choke on for longer and had a tendency to miss, hesitate and 'chug' a bit under load until she was warmed up.

Poking around under the bonnet, I thought to check the distributor and found that the central brush of the dizzy cap was completely worn down and had no spring left whatsoever. Whether or not that's the cause of the problems (and I suspect it might be), it needed sorting out and I thought I might as well track down a spare cap, even if mine is repairable.

The distributor used on the Daimler V8s (Lucas 20D8) is shared only with the Rolls-Royce Silver Shadow and its Bentley equivalents, so spares are rare and expensive. Luckily, a bit of ringing around found me a complete spare distributor for the price some places are asking for a repro cap! So I pootled out to darkest Ringwood this morning and picked it up from Jag Prestige Spares. A quick clean-up of the contacts and I put the 'new' cap on, and even though all I've done is a quick test-blast around the park, she seems to start more easily, idle smoother and pull better.

I'm not sure what I'll do with the spare distributor - perhaps I should get it set up with an electronic ignition system, and keep the original one with points for 'best'? Anyways, I've got it now and it can be raided for bits if needed - the vacuum advance widget on mine is very dodgy (it's held in place - poorly - with a short woodscrew!), and the one of the spare is perfect, so that's one thing I might swap over when I get the chance.

Keeping the green goo in
Ever since I bought Dame Zara she's lost coolant. I've tried both 4lb and 7lb radiator caps, fitted all new hoses, and had some weepy core plugs replaced, but still I have to top up the radiator on a regular basis. I've long thought of fitting an overflow container, but never got around to it. Then, a clever SP250 owner posting on the Daimler Forum said that he uses a cyclist's water bottle - cheap (mine was $8 at Big W) and easy. For the moment it's just held on with cable ties around the radiator drain lever, but if it proves successful, it came with a bracket that will be easy enough to fit.

Monday, March 19, 2007

At the suspension doctor's

Dame Zara has been off the road for the past week, in an inelegant yet elevated position up on the hoist at Trutrack Suspension in North Melbourne.

Under the caring eye of Dr. Ralph, head suspension surgeon, she has undergone a number of (in)delicate procedures, all of which are beyond the skills, equipment and experience level I can muster at home.
At the front end, upper and lower wishbone bushes have been replaced, the steering linkages are all being renewed and everything else has been checked, adjusted and cleaned up. New Koni Classic shocks are to be fitted all 'round - the front ones hadn't been installed when I took these photos.

Ralph has also sourced a reconditioned brake servo from JagDaim (from whence many other parts have come - all those not supplied by dad and his mates in Canberra), so we will now stop better as well as going over bumps and around corners in an unruffled manner.

At the rear, both leaf springs have been re-set and re-bushed to cure sagging and creaking (which is how I feel most mornings). The Panhard rod and link arm bushes had all been replaced just before I bought the car last year, so they were OK.
Ralph has been impressed at how sound, straight and rot-free the underside of the car is - no hidden horrors have come to light! He's even offered to replace the weepy core plug hidden under the left-hand exhaust manifold while she's up on the hoist: mainly I suspect because he was sick of coolant dripping onto his nice clean floor.

Quite a few weeks transpired between the original inspection and quote and the beginning of work, and once things got underway last Tuesday, Display Day was imminent. We had hoped to have everything finished by the end of last week, but it wasn't to be so and Dame Zara spent the weekend in 'hospital' awaiting track rods, wheel alignment and a final fettling, which meant that she missed Display Day.

However, Dr. Ralph's latest diagnosis is that all will be finished by this Wednesday and that the driving experience will be entirely transformed.

I'd love to say 'will be entirely transformed or your money back,' as this process will be costing me a four-figure sum ... but I suspect Ralph's terms of trade are rather more pragmatic!

But Trutrack is a very professional setup, and they know from all sorts of cars old and new, as the Lancia Monte Carlo, modern Ferrari, '75 Camaro, 50's Caddy, assorted rallying Subarus, and other exotica parked in the clean workshop attest.

I expect that Dame Zara will be back to her best - quite possibly the best she's been for decades - within days. If I don't update, it's because I'm having too much fun driving around roundabouts!

Wednesday, January 10, 2007

On the straight and narrow

Now, that has to be one of the easiest jobs I've done so far! Four screws and I now have a shiny black steering wheel centre instead of the motley-brown, sun-damaged one.

Before:


After:


The replacement came courtesy of eBay, from a 1966 Jag Mk10 being parted out in the US, and thanks to the slow period between Christmas and new year, it cost me less than a quarter of the price the parts places want for a repro.

The leather steering wheel cover, by the way, is from Wheelskins, and I heartily recommend them. For thin, sometimes slippery steering wheels, they add a nice amount of grip and some softness. I've actually bought four of them now: one for Kathy's previous car, Gussie the Hillman; one for her current car, Beryl the '75 Galant coupe; one for Dame Zara; and one for my dad for his '66 S-Type Jag 3.8.

I get them from this eBay seller in the US, who is very quick in supplying custom orders (Wheelskins doesn't have a retail distributor in Australia).

Sharp eyes might note the flouro orange markers on the tacho - they match the cruising speed of the car at important speed limits: 50, 60, 80, 100 and 110 km/h. The speedo is none too accurate at the best of times, and at the moment the needle is wobbling around like no-one's business!

The clock, which I used to be very proud to report worked - a rarity among Smiths clocks in cars - stopped for no apparent reason sometime before Christmas, but started up again the other day (for equally mysterious reasons) and is now keeping perfect time. I'll leave it well alone!

Saturday, December 30, 2006

It was a dirty job but someone had to do it

By the time I'd finished installing the exhausts I looked like a coal miner! Amazingly enough, I was allowed back indoors and after a very long and thorough scrubbing I returned to a near-clean condition. A few days on, and some of the scratches and grazes are healing up nicely, my fingernails are *almost* presentable, and many of the strange aches are passing.

If only I could have driven the car over the new exhausts and had them magically ascend into place ...

Thursday, December 28, 2006

Exhaust-ed!

The next time I get the bright idea to do a big job underneath the car - on my own, in the garage, with one jack and two axle stands - please all advise me to pay someone else to do it!

After three afternoons of work (it's not really the time of year to be bounding out of bed at early o'clock), I have finally finished fitting the 'new/old' stainless steel exhaust system I bought just before Christmas. The exhausts came from a sad, sickly yellow V8 that was being wrecked by local parts gurus Jag Prestige Spares .

As you can see from this picture, the old - I think, except for the mufflers, original - mild steel exhuasts had just about had it.


Getting the old system off was a messy enough task, but then I decided to be a bit more thorough than just bolting the replacements straight on:
- first, I took off the exhaust shields - three per side, and not all exactly the same - and was surprised to find once I'd given them a quick once-over with the wire brush that they were actually silver. It just so happened I had a spay-can of high-temperature silver paint handy, so they got a re-spray.
- then, looking at the underside of the car, I decided that some of the underseal needed attention. The centre of the car beside the driveshaft and the back under the rear seat pan were surprisingly good, but I ended up repainting much of the main beam that runs the length of the car (lots of underseal chipped off at various points where the car had been jacked up), one rear wheel arch and the underside of the floor on the left-hand side (the right side and the other three wheel arches can wait for another day!)

The end result was pretty decent, if I do say so myself:

Tuesday, November 28, 2006


a hole in the right-hand exhaust patched with a bandage ... but I've just located a near-new stainless steel system from a car that's being wrecked, so I'll be replacing the whole rusty set-up soon. (note to self: must repair that patch of underseal I've taken off with the jack!)

The lower photo is of the front valance panel (which goes under the front bumper). It looks in a pretty sad state, but a going-over with a wire brush and two coats of POR15 rust-proofing paint now has it looking pretty spiffy. Posted by Picasa

Fresh sandwiches, no more leaks and a (pretty) full service

Current mileage: a hair over (1)57,000
Costs since last time I totted them up in July: $700

It seems like ages since I've updated, and plenty has happened of late.

Let's see ...

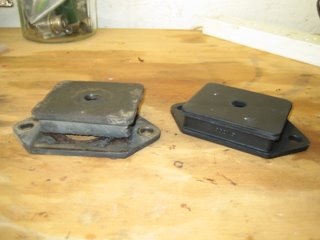
Firstly, I've replaced the front suspension 'sandwich' mounts, as DLCV V8 guru Jack 'Fast Eddy' Edmonds was correct in his telephonic diagnosis that they were had it (old one on the left).

This still hasn't cured all the clonks in the front suspension though, so there will still be some ball joint &/or bush replacing to go, and most likely shock absorbers too.

Next up, I had the rear window seal replaced - which turned into a bit of a runaround when the guy who was doing the job got the window our and discovered that the reason the demister had never worked for me was that both wires were broken off the element. So I picked up the window and took it to Connections and had then re-solder the wires, then took the window back and had the seal fitted. The window no longer leaks, but he didn't do a great job with re-fitting the chrome strip ... And as I took out all the water-damaged headlining around the rear window, I'll also need to have that re-made - and the parcel shelf and a few other bits of trim while I'm at it.

Last Friday I took the day off work and set to doing most of the tasks on the 2500 and 5000-mile service checklist, including:
  • oil change (decided to try Penrite HPR30 this time)
  • fresh oil filter
  • went around pretty much the whole car with grease gun, oil can and WD40, lubricating everything from rear springs to door hinges to carburettor pots

I also took off the front valance panel and repainted it with POR15 rust-proofing paint, and fixed a leak in the rusty exhaust with a bandage (pics in a separate post above, as I can't seem to add more than two images to this post).

I also took the opportunity to re-fix a few things I thought I'd 'fixed' before, such as the front passenger door-handle, the stud on the dashpad and the left-hand handbrake caliper.